Welcome to my little corner of "The Cloud"
LIST OF FREE PATTERNS
BOTTOM LEFT SIDE OF PAGE

FAVORITE PAGES INDEX TOP RIGHT
DOUBLE CLICK ANY PHOTO TO ENLARGE FOR VIEWING
All patterns written in US crochet terms

Top 10 Most Popular Patterns This Week

Sunday, April 14, 2013

35 SQUARES

This afghan only requires 35 squares

Materials
about 32 oz. WW yarn for main color
Assorted colors of yarn from your stash
to make one (1) block (approximate yardage)
square center = 2 yards
rounds 2  & 3 = 7 yards
rounds 3 & 4 = 12 yards
rounds 4 & 5 = 16 yards
as always exact yardage depends upon the yarn, your tension and hook size
This afghan was made with Red Heart Super Saver yarn and a Susan Bates I-9 Hook
Finished project is about 40 X 55 inches.

Granny Square Blocks  
(these blocks measure about 7 inches square)

Start with a slip loop or chain 4 join to create ring.
Rnd 1. in ring work chain 4, 3 dc, ch 2, 3 dc, ch 2, 3 dc, ch 2, 2 dc, join to 2nd st of starting 4 ch. You should have 4 groups of 3 double crochet with a chain 2 space between each group.

Rnd 2. Sc in any 2 chain corner space, *(ch 3, sc in same corner, chain 3, sc in next corner) repeat around ending, join with a slip stitch in the first sc.


Rnd 3. In each corner loop work 3 dc, ch 2, 3 dc, work 3 dc in each ch 3 sp between corners.
Repeat rounds, 2 and 3 for desired size of Square.


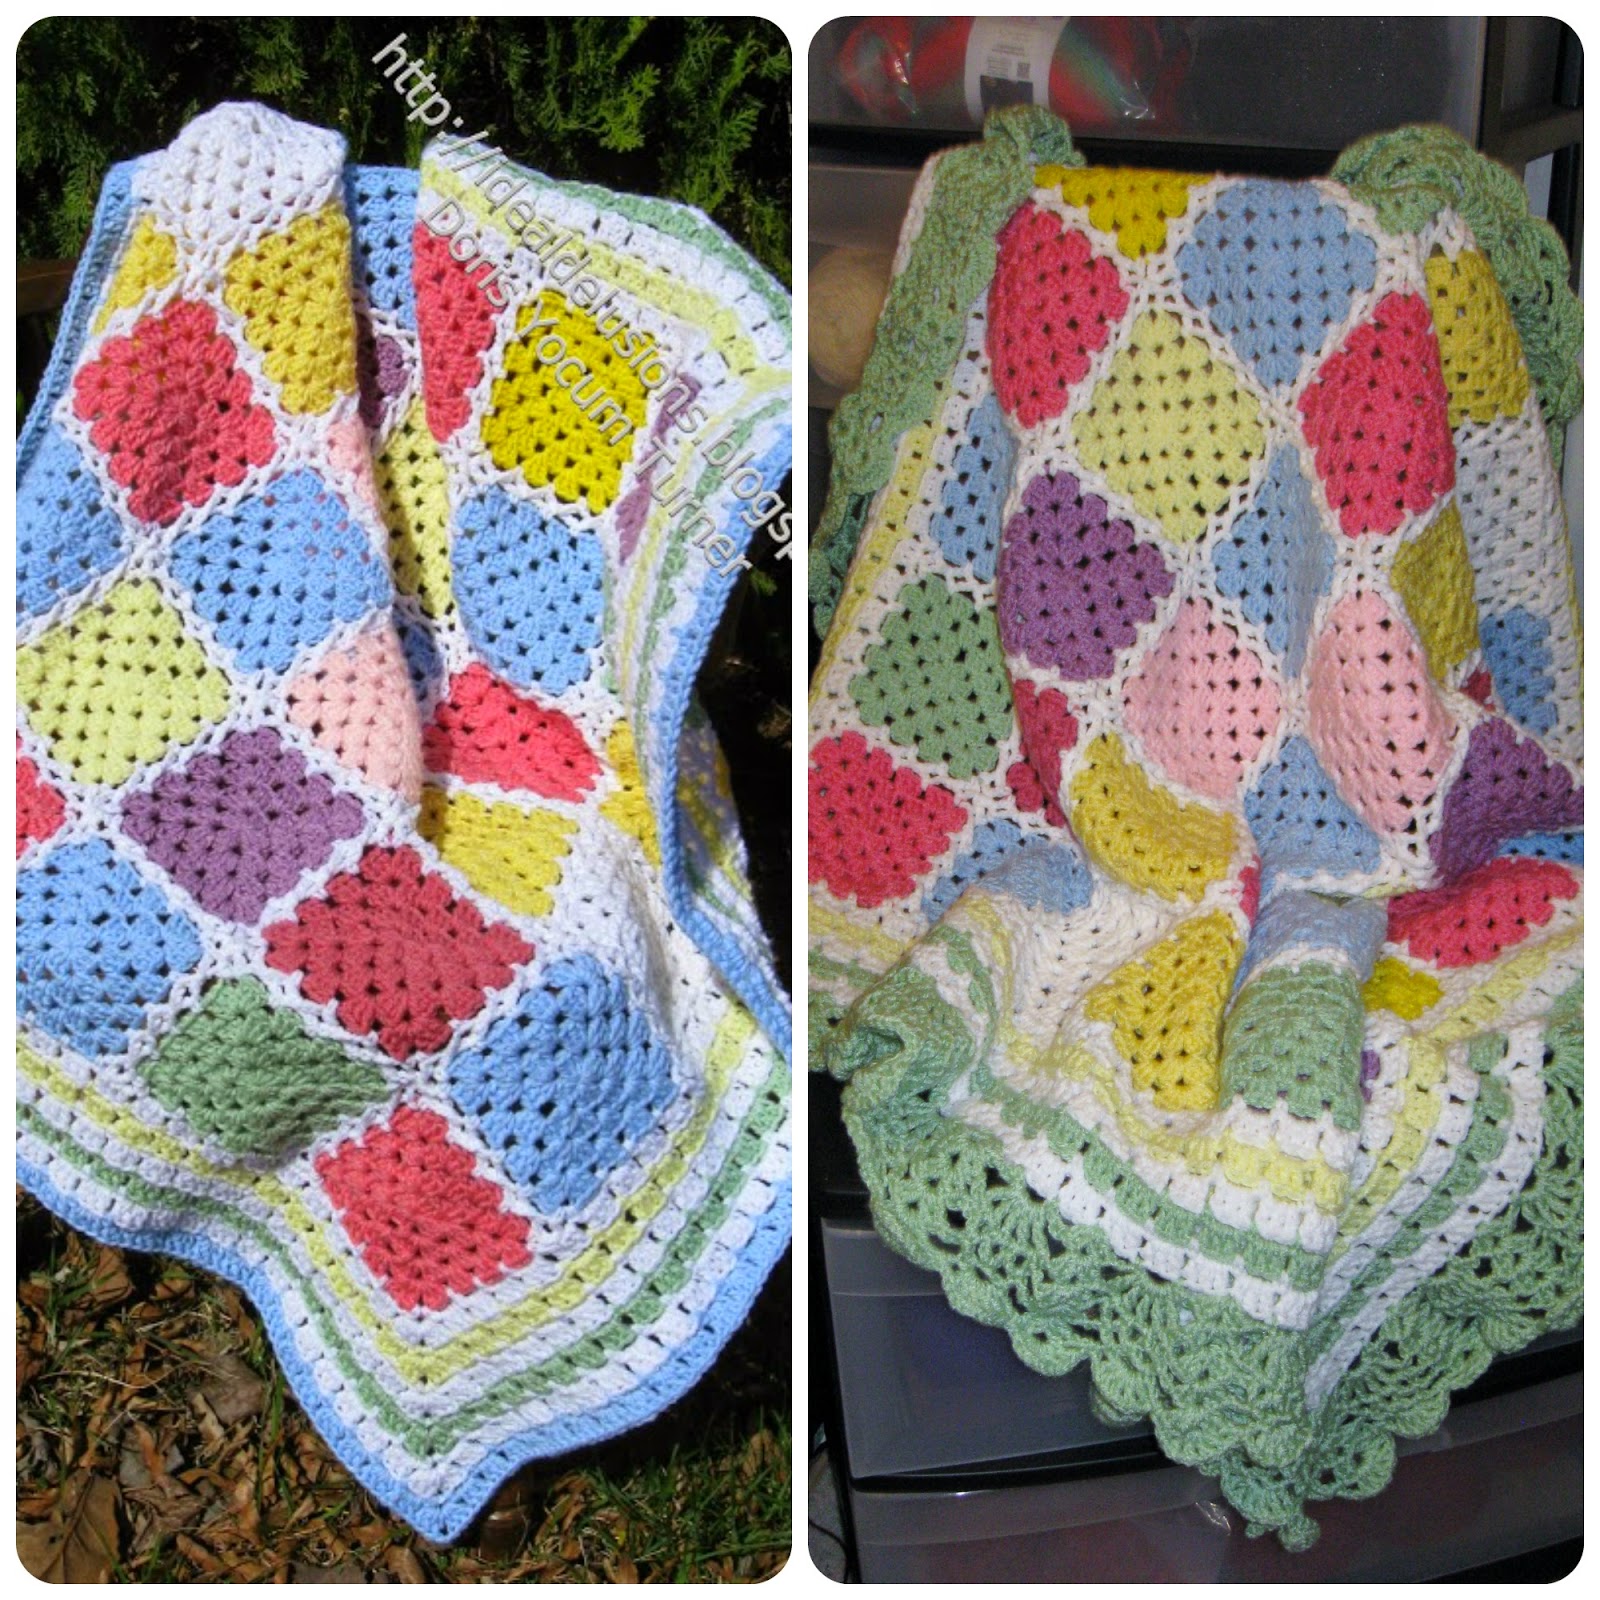
For this afghan I made two identical blocks of each color and one block for the middle block.  You may notice I have about 5 different shades of green in this afghan and I did not want them to all end up in one corner so I laid the blocks out in a mirror image, moving the sets around until I was satisfied with the color combination.  I always lay my blocks out before I begin to join, then I take a photo of the layout.  Last I stack the blocks in the order in which they will be joined and I check the photo as I work to be sure I am following the pattern.
I did use the 5 chain braid continuous join to connect the squares  however you may join them in any manner you chose.

I love the Continuous Join method and You Tube has an amazing 2 part tutorial showing exactly how to do it.  Here are both links:


http://www.youtube.com/watch?v=PoBG9W9rpog


http://www.youtube.com/watch?annotation_id=annotation_282853&feature=iv&src_vid=PoBG9W9rpog&v=foQB6X8q2a0


NEW

This is an “off site” link and is NOT one of mine.  I cannot provide a PDF copy of the post.  This is a link to a written version of the continuous join, for join as you go, complete with photos. 

http://babylovebrand.net/2013/08/27/continuous-join-as-you-go-again/


 For the border I worked the pattern stitch starting with the double crochet row in the existing loops around the outside.  Then I worked the single crochet row and finished with the dc row.   More rows could be added for a larger project or a lacy "V" stitch border could be added.


For all blankets using this stitch please see: 
Do you already have a stash of basic granny square blocks you are dreading to join?  Grab a 14 oz skein of yarn and enlarge those squares, using rounds 2 and 3 from this pattern, use the Continuous Join method to finish and see how quickly you can create a masterpiece.


48 Squares with "V" st & Picot border


This afghan was two baby afghans, made in the tradition granny square, which I still don’t know why I made because I’ve always hated baby afghans.  They seem like a waste of time to me as they stay small but babies don’t.  So I removed their borders and joined them into the young lady afghan you see on the left.  But still nobody seemed to notice her and she sat, a sad little plain granny all alone on the shelf for almost a year.  I wanted to make her happy so I decided to give her a new dress.  On the right you can see how much she loved her new outfit.  Once she got her smile, she found her forever home in less than a week.   
36 Squares ~ Shell and Pineapple border from 
Doris Chan's All Shawl Pattern on Ravelry

Thursday, April 4, 2013

Designing Box Stitch Afghans

I love this stitch pattern however I am not a huge fan of the plain “side to side” box stitch afghan, so I do not have one to show you.  I know I am strange, my opinion only, I don't care much for how the stitch pattern seems to flow all in one direction. I make most of my Box Stitch patterns in rounds rather than rows. This post is to show several ways to start the box stitch for side to side or rounds, with chain stitch and/or center start.   Please see notes at bottom of post.
Basic Side to Side Box stitch:
Chain desired width of project, the number of chains must be divisible by 3 + 2 sts.
Row 1. Sc in 1st chain from hook, *(ch 3, skip 2 ch, sc in next ch,) across row, ending sc in last st, turn.

Row 1
Row 2. Ch 3, work 3 dc in each ch 3 space across row, dc in last sc, ch 1, turn.

Row 2
Row 3. Sc between first 2 dc, ch 3, sk 3 dc, sc between next 2 dc across
ending sc in top of turning ch.

Row 3

Row 4. to end: Repeat rows 2 and 3 for desired length of project.

When you start this way you will find the finished project will have a chain loop edge on the bottom as well as both sides and if you end with the sc/ch st row it will be all around the project and you will be able to go right into your chosen border.
**********
Alternate start: 
Row 1. Chain 4, work tr in second st, (first loop made) ch 3, tr in top of first tr, (second loop made) continue in same manner until you have enough loops to equal the desired width of your project.


Row 2. Ch 3, (counts as first dc) work 3 dc in each loop across row, 1 dc in first chain. You should have 1 dc, a row of loops with 3 dc in each loop and 1 dc at the end, ch 1 turn.


Row 3. Sc between first 2 dc, *(ch 3, sk 3 sts, sc between next 2 sts,) work across row ending sc between last 2 sts, ch 3 turn.


Row 4. 3 dc in each 3 ch space across, dc in last stitch.
Row 5. to end Repeat rows 3 and 4 to desired length of project


You may notice this method will give you the same results as the first method but I believe it is easier and more versatile as it is excellent for “fluffy” yarns where it may be harder to see the stitches, and it makes it unnecessary to count stitches for a starting chain.
**********


Center Start 
Begin the same as the Basic or Alternate start, work desired length or width.
To work from the center out, work side to side pattern first on one side then rotate the project clockwise and work opposite side of loops to match.  I have changed colors to make it easier to view.  When working a multi color project you may wish to coordinate your colors and stripes.

It is a good idea to mark the front of the piece as reference so your stitches will match.


Center Start for Giant Granny or Granny Square Blocks
Start with a slip loop or chain 4 join.
Rnd 1. in ring work chain 4, 3 dc, ch 2, 3 dc, ch 2, 3 dc, ch 2, 2 dc, join to 2nd st of starting 4 ch. You should have 4 groups of 3 double crochet with a chain 2 space between each group.


Rnd 2. Sc in any 2 chain corner space, *(ch 3, sc in same corner, chain 3, sc in next corner) around end, join with a slip stitch in the first sc.


Rnd 3. In each corner loop work 3 dc, ch 2, 3 dc, work 3 dc in each ch 3 sp between corners.
Rnd 4. Repeat rounds, 2 and 3 for desired size of project.


Center start for Giant Rectangle:
Rnd 1. Use alternate start method to create 8 loops. 
Rnd 2. Ch 3, 2dc, ch 2, 3 dc, in first loop, (this will be your first corner) 3 dc in each of next 6 loops, 3 dc, ch 2, 3 dc, ch 2, 3 dc in last loop, (this will be your next 2 corners) working on opposite side of loops, work 3 dc in each of next 6 loops, end with 3 dc, ch 2, join to top of ch 3 in beginning loop. 

You should have 3 dc groups with a ch 2 space between each group on each end and 6 loops of 3 dc each between the ends on both sides of the starting loops


Rnd 3. Working on the end, Sc in the first 2 ch space of corner, ch 3, sc in same sp, ch 3, skip 3 dc group, sc in next 2 ch sp, ch 3, sc in same space, (first & second corner loop complete) ch 3, skip 3 dc, sc between next 2 dc, ch 3, skip 3 dc, sc in next space, to next corner. Work sc, ch 3, sc in 2 ch space, ch 3, skip 3 dc group, sc in next 2 ch space, ch 3, sc in same space, (third and fourth corner loop complete) ch 3 skip 3 dc, sc in sp between next 2 dc around to end. join


Rnd 4. Work 3 dc in each ch 3 space around, working 3 dc, ch 2, 3 dc in each corner 3 ch loop.


Rnd 5. Work sc, ch 3 between each 3 dc group, work sc, ch 3, sc loop in each corner.


Repeat rnds 4 and 5 to desired size of project


Little Boy Blue
The center for Little Boy Blue is three small blocks, sides joined as you go on round 5.  Work  a round of (single crochet, chain 3,) around the outside of all 3 blocks. The next round will be the cluster round then follow the basic pattern 2 round routine to the size you like. 
Notes for Stash-busters:

Width Verses Length:
Working side to side, you will be turning your project at the end of each row, it would be wise to mark the front side so your stitches don't get reversed.  (You will be able to tell when finished)
If you are using new skeins or larger balls of yarn from your yarn stash you can easily work on the length and can pre-determine the finished length of your project   If working on the length you do not have to work in the beginning and ending yarn tails as you may work them into a fringe on the ends of the afghan. 


If you are using small balls of yarn from your stash it is more prudent to work on the width if you want the entire row to be all one color also you can pre-determine the finished width.  Working on the width will require cutting and working in yarn ends unless you plan to fringe around the entire project. 


Center Verses Edge:
If working side to side and you have unlimited yarn you can start on one edge and work to the end.  However if you are working with limited yarn amounts it is easier to create a balanced afghan if you start in the center and work outward toward the edges.  Advantage of a center start, working on the width, the project can continue to grow in length as more yarn becomes available.  I often start an afghan and expand it as I acquire more compatible orphan yarn and scraps.  I usually start with a full skein of a neutral color as a base, then I work in a row or two of that color, every so often to pull all the colors together.


Disadvantage of a center start, to balanced your colors you must rotate the working side on each color change as you proceed, unless you wish to divide your available yarn beforehand.


I have divided my yarn in the past but it never seems to work out well as I never seem to be able to exactly divide what I have and usually end up running a shortage on the second side.  If one side is already complete, well lets not even think about that.  It is easier to keep your skein intact ( I hate knots ) and alternate sides as you work.  I am fortunate to have a yarn ball winder and that allows me to pull from both the inside and the outside of the yarn simultaneously so alternating sides is best for me.  Here I will repeat, you should always start your new color on the same side (front or back) of your project or your double crochet stitches could get reversed.  Yes, you will be able to tell.


For all blankets using this stitch please see: